The menu shown on Enceladus Prime can seem like a lot to take in. This guide aims to aide in making sense of the menu, as well as providing tips as to how the information some provides and lets you change can aide with your experience.
Overview of Enceladus Prime's Menu
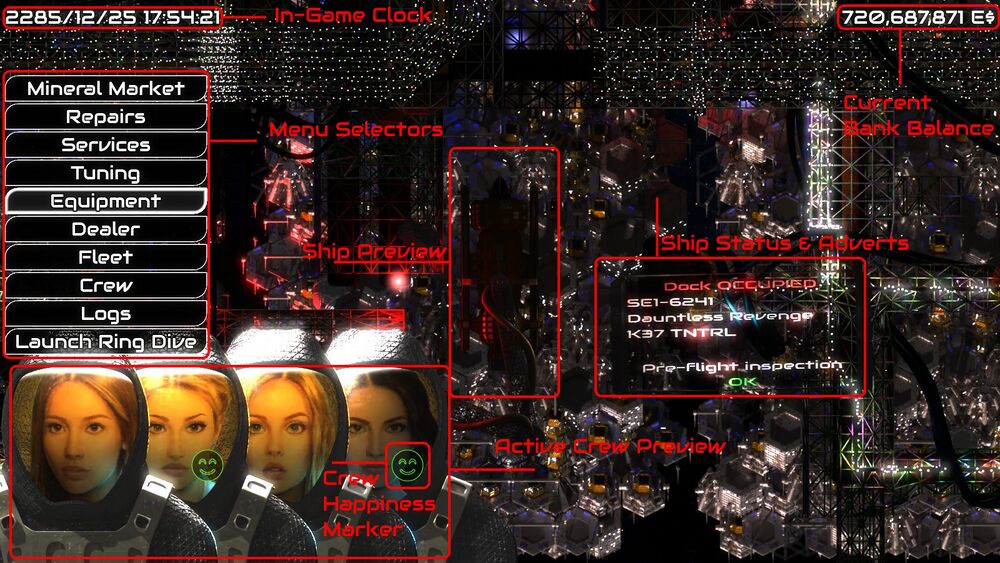 Enceladus Prime's menu can have a lot of information to take in.
Menu Selectors
These buttons link to various menus at Enceladus Prime. For this guide, we will be focusing on the following menus:
These other menus won't be covered in full in this guide, but will receive a mention later in this section to cover any necessary information:
- Mineral Market
- Services
- Dealer
- Fleet
- Logs
Current Bank Balance
Displays the current direct purchasing power. Several things are based around this number, regardless of worth elsewhere.
You start with 20,000 E$ in the bank to begin with. It is generally a good idea to use some of this to get a cheap geologist, if one is available. See here for more info.
Ship Preview
Displays a visual of your currently selected ship. Not too useful, but any sparks shown generally infer that it needs repairs, or is currently receiving them.
Ship Status & Adverts
- Displays your ship's identifier, name, hull type, and whether or not you are allowed to fly it in it's current state (see repairs)
- Displays adverts
- Displays recent changes in mineral prices, which aren't going to be too useful early on.
In-Game Clock
This displays the current game date and time, useful for planning around crew paychecks.
Active Crew Preview & Crew Happiness Marker
Shows a mugshot for every crewmember currently active for the selected ship.
The happiness marker is displayed next to a crewmate that is particularly happy or unhappy. A crewmate becomes happy when they've been through a good hotel or event from the services menu, having been bought drinks within the rings, or whilst flying the OCP or Peacock Prospector ships, and will go down when their wages haven't been paid, or have been flying in the Vulture Prospector. A particularly unhappy crewmember may have a chance of leaving you if things don't improve.
Mineral Market
This menu shows how ore prices have changed recently, and how they're predicted to change. It's not particularly useful early on, but if you ever press the 'Send to Storage' button after returning from a dive, this is where your ores are stored.
Services
This page offers services such as hotels and restaurants to skip time with, insurance offerings, and lets you pay off any bills incurred from accidents within the rings.
Tuning
Tuning options allow for many changes to the ships behaviour. It is a very advanced menu, so only use once you've gotten to grips with how the game works extensively, however one tuning option can be useful earlier on:
Xenon transit usage, found closer to the bottom by the section marked for your computer, is the amount that the thrusters use Xenon to reach the rings. At the 100% default, it takes 3 days to reach the rings, but if you need to get there faster, you can lower it, at the cost of using reaction mass from your propellant tanks instead.
Dealer
This menu lets you purchase ships. It's best left for later to be used.
Fleet
This is where every ship you own appears. If you ever capture a derelict ship successfully while in the rings, it will appear here.
Logs
This menu logs recent activity. Good for keeping track of things, but not at all necessary to use.
Jameson's Insurance
Insurance is not exactly insurance in the typical sense, it is more a pay in advance for replacement parts, while doubling the effective price of what you paid. You start with 100,000 E$ in insurance, which will be spent for repairing parts before repairs dig into your own pockets. It is useful to have as a safeguard in the event that chasing an ore nugget goes wrong.
It can be sourced from the services menu, costing 50,000 E$ for 100,000 E$, or you can buy if off of SAR ships within the rings, for 10,000, 25,000, and 100,000 E$ options, doubling what you spent respectively.
Menus
Repairs
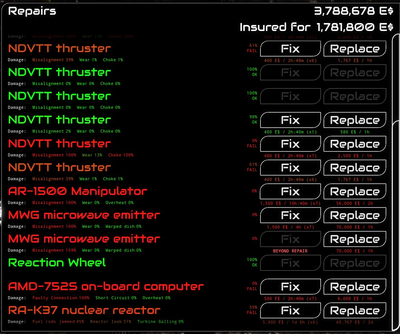
The repairs menu shows the status of all equipment on the ship, the damage level of any equipment that can be damaged, and allows you to repair that equipment to the best ability your mechanics can, or just straight up replace it.
Equipment damage on this menu is calculated as an average of all 3 types of damage that can happen to a piece of equipment. Once this average falls below 70%, it will be marked by a FAIL when attempting to dive, and it needs to be repaired before the ship is allowed to fly again.
Repairs base themselves around the in-game clock. You do not need to wait the time it says in real time, and there are ways to skip it. You can purchase a hotel room for long enough to complete the repair when trying to start the dive, or if you have a second ship, you can fly that in the meantime as it can take several days within the rings.
The efficiency at which repairs can happen does have an exponential dropoff. Every time that you repair the equipment, the damage to each of the three categories is cut in half. For example, a thruster has 12% misalignment, 20% wear, and 60% choke, one repair to this will change it to 6% misalignment, 10% wear, and 30% choke. Because of this, things get more costly to repair the better fixed they are. Once you have a mechanic that can repair well enough (see crew), it is generally advised to repair between 80% to 90% average durability for maximum cost effectiveness.
Something for more advanced miners, whilst you are mid-dive, you also have the option to jury-rig equipment on the mechanic tab in OMS. Each one of the three damage types that the equipment piece can sustain will have a slider for each. These sliders let you adjust for the damage taken by that type, at the cost of lowering the durability of one or two of the other damage types. Do note that while a slider is above the middle, it will gain durability, but take more damage of that type, and while is it below the middle, it has less durability but takes less damage.
Equipment
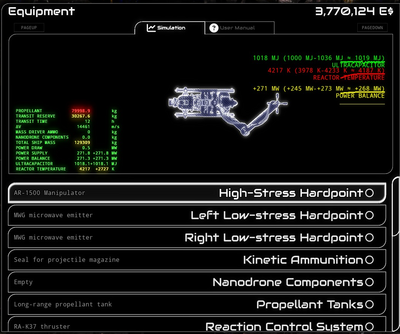
Delta-V is a unique game in that equipment is not upgrades, it is mostly side-grades. Choose equipment to specalise your ship to your preferences, making your ship better for your favorite missions. More expensive equipment is not always better, but it will cost more to repair. Usually more expensive means it is suited for more advanced users.
Ship equipment is very forgiving in that you can trade any equipment back for a 100% refund, minus a small fee for any damage you incurred. Feel free to experiment.
Most equipment requires more power (better turbine / ultracapacitor) and/or more reactor heat (reactor). You will likely want more fuel (Propellant tank) and note that these changes will increase your ship's mass. Describe how the thermal and power icons work on the equipment screen. Use the simulation to ensure your ship handles the way you expect -try running all the engines and firing to make sure you don't run out of power or thermal (heat).
Later on, once you have a decent chunk of cash, you can fit an MPU (Mineral Processing Unit) to your cargo bay. These allow for ore chunks to be processed down into a form that can be stored within the ship, as well as refilling on reaction mass for most modules. Each ship will have a different amount that can be stored within the ship, but the starting K37 allows for 7,000 Kg of each mineral to be held. Once the processed hold for a mineral is full, ores of that type will still process, producing reaction mass for your ship if it supports it, but the ore will be lost. This can be mitigated by clicking on the power button next to it's name in the mechanic tab of OMS.
Again, this page cannot fit the entirety of the necessary information about the equipment menu, so more in depth information will be on this page here.
Dealer
The dealer menu allows you to purchase new and used ships, and also will be where any ship you sell will show up (do note that any ship currently under repair cannot be sold until the repair is complete). It cycles on a per-day basis, with a used ship appearing in the dealership every day, and a new ship appearing once per week. A new TNTRL K37, Eagle Prospector, Eon Interstellar Model E, and AT-K225 Titan will always appear at the top of the dealership every week, and cycles weekly.
Ships in the dealership have an 11% markup, so the hull resell value will always be a little less than what you purchased it for, even with used ships. Ships will leave the dealership after a while as other ringas purchase ships. When purchasing a ship, you are also given the option to trade in your currently selected ship in the event you are confident in the purchase, and the ship is not currently going through repairs.
The ships that can currently appear in the dealer:
Every ship has it's own gimmick and use, no ship is 'better' than another ship, as one ship may do a specific task better than another, but may not be as good at a different task.
Fleet
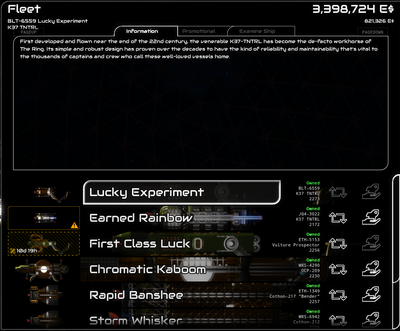
The fleet menu shows the ships that you currently own, whether a ship is ok to fly, needs repair, or is currently undergoing repairs. There is no limit to the number of and types of ships that you are able to store.
Like the dealer, the fleet menu lets you see the information regarding a ship, as well as showing it's promotional footage, and letting you examine it. Examining a ship shows you the stats (number of and types of hardpoints, crew capacity, dry mass, cargo bay volume, and processed cargo mass limit), as well as providing the Minding Virtual Flight Service.
Crew
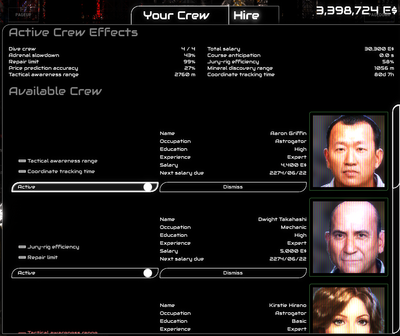
The crew menu allows you to hire and manage crew. Some roles are generally more important than others.
The four types of crew & their jobs:
- Astrogator: Keeping track of objects in the rings for you to visit later on, which can be found in the astrogator tab in the OMS menu for when you want to visit them later
- Geologist: identifies the content and value of ores by displaying a green box around them showing water content, ore content, and estimated value, as well as better estimating the total value of ores in the hold compared to market value
- Mechanic: speeds up repair times so that you don't have to wait as long between repairs
- Pilot: increases the adrenal slowdown, as well as automatically starting it when close to collision
When starting out, it is important to get one to two crew members based on what's available. As you only have 20,000 E$ to start out with, you need one cheap, and given that a cheap crew member may not always be available for each role, you will have to prioritize. The general consensus is as follows, in highest to lowest priority:
- Geologist: absolutely vital. As they allow you to see the values of ore chunks, it means you can nitpick the more valuable ones to profit more on a dive
- Astrogator: almost absolutely vital. Allows you to track points of interest for longer than the 12 hours you can do yourself
- Mechanic: decently useful, allows you to speed up repairs with a mechanic, and allows you to more effectively jury-rig mid dive.
- Pilot: somewhat useful, increases slowdown strength, and automatically enables slowdown when close to collision
Your starting ship (the K37) can fit four crew members, so one of every role can be handy.
Crew can have a very wide variety of wages, from less than a few thousand for inexperienced crew, to dozens of thousands for a hardened and experienced crew. If you are bent on getting the cheapest possible crew, and want to see the absolute lowest possible wages, they are listed per-role here, however do note that a difference of a couple of hundred or a couple of thousand isn't usually that bad:
- pilot: 400
- mechanic: 400
- geologist: 600
- astrogator: 500
It can be a good idea to hire extra crew in the event that one of a particularly useful role gets incapacitated and has to take leave for a month or so, and lets you continue without a hitch.
If you would like to fully utilize crew, more information is accessible on this page here.
Launch Ring Dive
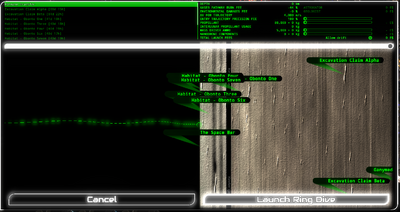
The launch ring dive screen is a vital menu for operations within Saturn's Rings. From it, you can select a location in the rings to astrogate to, pay a fee to have extra precision when entering the rings, choose how much remass, mass driver ammunition, & nanodrones are purchased before starting the dive, and choose to allow drift.
The main feature of this menu is the map of the rings that is shown. It lets you astrogate to any point in the rings, up to a depth of 2,700 Km, however astrogating anywhere further than a depth of 0 Km will incur XASER pathway burn and environmental damage fees, which both can be lowered by up to 98% with an experienced enough astrogator and geologist respectively. Astrogating by default can be very inaccurate, however the precision can be increased by increasing the XASER and environmental fees by a multiplier of up to 2000%.
Using this menu can be very helpful to travel to propellers, or the stripes of denser rock formations that are caused by the moonlets in the centre. These will generally contain significantly more ore than elsewhere in the rings, and particularly dense areas of them have special music to signify it, usually close to the centre.
Heading to astogation points from this menu is usually not worth the price, unless you are willing to spend a lot on precision just to get there quickly. It's significantly cheaper to just head to the edge, then astrogate further in for a more accurate result at the cost of a little time.
Other Menus
Dealer
The dealer lets you see other ships that you are able to purchase. The 'inspect ship' tab lets you see general stats and equipment, as well as letting you use the Minding Virtual Flight Service, which lets you test fly a ship without needing to purchase it and head to the rings first.
Some ships may not be ready out of the box, and may require maintenance before flight. These are indicated by the yellow box and checkmark usually used to indicate damaged ships.
Note that the ship age is flavour text, and may not be 100% accurate to the description.
Fleet
The fleet menu shows you every ship you own, including those you have successfully salvaged from the rings. You will be able to tell which of your ships need repair, and any under repair, and you may switch between any ship at any point whilst at Enceladus Prime. You also are given the choice to sell any ship that is not the active ship, except for when a ship is currently undergoing repairs, where you will have to wait for repairs to finish.
A ship that is damaged but not undergoing repairs may still be sold.
