(updates mineral market and added sections for repairs & services) |
(finished adding information, pushing full guide release) |
||
| Line 1: | Line 1: | ||
The menu shown on Enceladus Prime can seem like a lot to take in. This guide aims to aide in making sense of the menu, as well as providing tips as to how the information some provides and lets you change can aide with your experience. | The menu shown on Enceladus Prime can seem like a lot to take in. This guide aims to aide in making sense of the menu, as well as providing tips as to how the information some provides and lets you change can aide with your experience. | ||
| Line 71: | Line 69: | ||
On the other side of things, any fines that have been incurred from Vilcy, Obonto Habitats, and/or other miners will be displayed at the bottom. These will vary depending on whether any damage was accidental, or increasing to a decent amount if substantial damage was sustained. Do note that fees cannot be paid off if an organization's headquarters isn't operational. | On the other side of things, any fines that have been incurred from Vilcy, Obonto Habitats, and/or other miners will be displayed at the bottom. These will vary depending on whether any damage was accidental, or increasing to a decent amount if substantial damage was sustained. Do note that fees cannot be paid off if an organization's headquarters isn't operational. | ||
[[File:Tuning menu.png|thumb|400x400px|The tuning menu makes use of an equipment's combustibility to provide a greater range of use]] | |||
== Tuning == | == Tuning == | ||
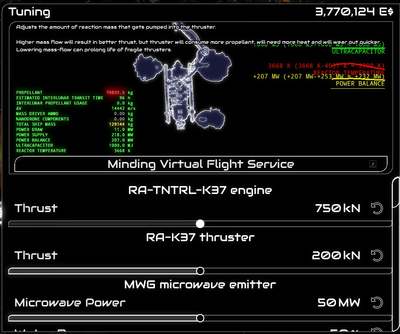
The tuning menu allows for a whole array of modifications to the hardware you can install on your ship. This can range from increasing the power of a mass driver, changing the power of your thrusters, to tweaking how the autopilot behaves. The options this provides greatly increases the customisation potential for your ship even further than the options given from the equipment menu. | |||
Due to the sheer number of options and possibilities, and the general complexity that this menu provides, it's options and capabilities will be furthered [[Tuning guide|on this page here]]. This is a much more advanced menu, so it is recommended to delve into it only once you understand a decent bit of how different equipment works, and how different variables affect things. | |||
The tuning menu also provides the [[Virtual Flight Service]] to test tuned setups pre-flight. | |||
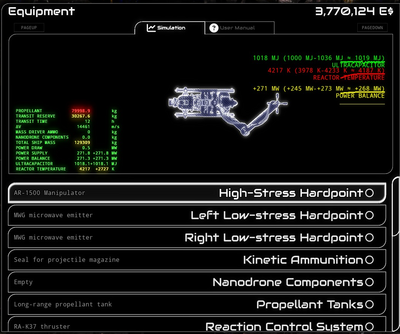
[[File:Equipment Menu.png|thumb|400x400px|The equipment menu allows for equipment to be swapped out, removed, or installed.]] | |||
== Equipment == | == Equipment == | ||
The equipment menu will display and allow equipment installed to the ship to be inspected, and if you choose to, be replaced with a different item in it's place. Every different equipment piece has a use, some more specialised than others, and some may have uses that are not immediately obvious or have more than the initial obvious use. | |||
Not every ship will be able to fit every piece of equipment. Many ships are specialised for different purposes, while others are better for a general role. The standard K37 is a ship capable of any task within the rings, and can be fitted with all equipment pieces, so it is a good choice to use when trying out different options. | |||
Again, this page cannot fit the entirety of the necessary information about the equipment menu, so more in depth information will be [[Equipment|on this page here]]. | |||
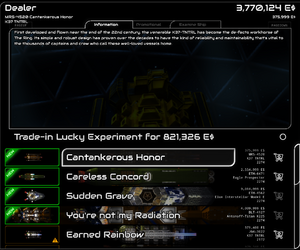
[[File:Dealer Menu.png|thumb|An example of the dealer menu, note the new K37, Eagle Prospector, EIME and Titan that appear at the top every week]] | |||
== Dealer == | == Dealer == | ||
The dealer menu allows you to purchase new and used ships, and also will be where any ship you sell will show up (do note that any ship currently under repair cannot be sold until the repair is complete). It cycles on a per-day basis, with a used ship appearing in the dealership every day, and a new ship appearing once per week. A new TNTRL K37, Eagle Prospector, Elon Interstellar Model E, and AT-K225 Titan will always appear at the top of the dealership every week, and cycles weekly. | |||
Ships in the dealership have an 11% markup, so the hull resell value will always be a little less than what you purchased it for, even with used ships. Ships will leave the dealership after a while as other ringas purchase ships. When purchasing a ship, you are also given the option to trade in your currently selected ship in the event you are confident in the purchase, and the ship is not currently going through repairs. | |||
The ships that can currently appear in the dealer: | |||
* [[K37|K37 TNTRL]] | |||
** [[KTA24|KTA24 TNTRL]] | |||
** [[KX37|KX37 TNTRL]] | |||
** [[KR37|KR37 TNTRL]] | |||
* [[Cothon-212]] | |||
** [[Cothon-211|Cothon-211 "Chonker"]] | |||
** [[Cothon-213|Cothon-213 "Triplet"]] | |||
** [[Cothon-217|Cothon-217 "Bender"]] | |||
* [[Eagle Prospector]] | |||
** [[Peacock Prospector]] | |||
** [[Pelican Prospector]] | |||
** [[Vulture Prospector]] | |||
* [[K225|AT-K225]] | |||
** [[K225-BB|AT-K225-BB (Break Bulk)]] | |||
* [[Model E|Elon Interstellar Model E]] | |||
* [[ND-LIS Kitsune]] | |||
Every ship has it's own gimmick and use, no ship is 'better' than another ship, as one ship may do a specific task better than another, but may not be as good at a different task. | |||
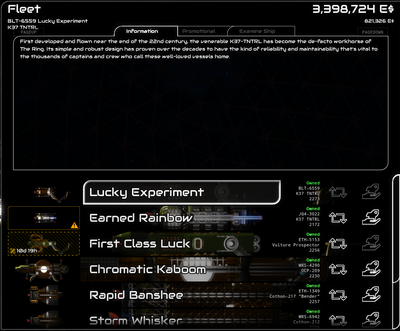
[[File:Fleet Menu.png|thumb|400x400px|An example of the fleet menu. Note the damaged ship and ship under repair]] | |||
== Fleet == | == Fleet == | ||
The fleet menu shows the ships that you currently own, whether a ship is ok to fly, needs repair, or is currently undergoing repairs. There is no limit to the number of and types of ships that you are able to store. | |||
Like the dealer, the fleet menu lets you see the information regarding a ship, as well as showing it's promotional footage, and letting you examine it. Examining a ship shows you the stats (number of and types of hardpoints, crew capacity, dry mass, cargo bay volume, and processed cargo mass limit), as well as providing the [[Virtual Flight Service|Minding Virtual Flight Service]]. | |||
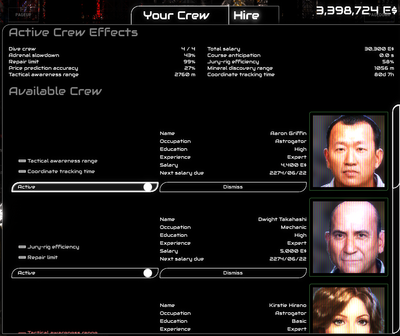
[[File:Crew Menu.png|thumb|400x400px|An example of the crew menu with a couple active on a K37]] | |||
== Crew == | == Crew == | ||
The crew menu allows you to hire crew, view the stats of your crew, change which crew members are active on a ship, and dismiss them from service. Having crew members can be a vital part of working in the rings, as each has a role that can greatly increase your performance when collecting ores, and keep track of things in the rings. Due to how complex it can get, more information is accessible [[Crew|on this page here]]. | |||
The four types of crew & their jobs: | |||
* Astrogator: Keeping track of objects in the rings for you to visit later on | |||
* Geologist: identifies the content and value of ores, as well as better estimating the total value of ores on the market | |||
* Mechanic: speeds up repair times so that you don't have to wait as long between repairs | |||
* Pilot: increases the adrenal slowdown, as well as automatically starting it when close to collision | |||
Crew can have a very wide variety of wages, from less than a few thousand for inexperienced crew, to dozens of thousands for a hardened and experienced crew. The lowest possible wages are listed per-role here: | |||
* pilot: 400 | |||
* mechanic: 400 | |||
* geologist: 600 | |||
* astrogator: 500 | |||
[[File:Logs Menu.png|thumb|400x400px|An example of the Logs menu showing several entries]] | |||
== Logs == | == Logs == | ||
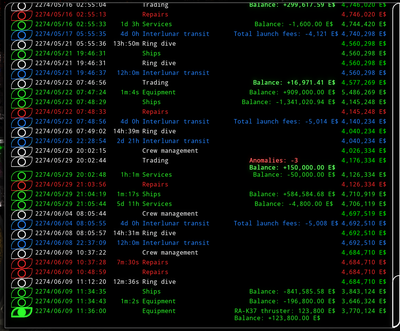
The logs menu shows everything that you have done in the game over the past few months. It displays each event with a timestamp, how long it took (if applicable), the name/type of event, a change in cash in the bank (if applicable), and the current bank balance at the time of it's completion. Each event will be colour-coded with a different colour depending on the event type: White is management of resources, green is management of services, red is repairs, and blue is interlunar transit. Clicking the circle next to any event gives a more detailed description. | |||
A full list of event types is as follows: | |||
{| class="wikitable" | |||
|+ | |||
!Name | |||
!Colour | |||
!Description | |||
|- | |||
|Equipment | |||
|Green | |||
|Any changes to equipment, covers change in cost (money spent = negative, money received = positive) | |||
|- | |||
|Ships | |||
|Green | |||
|Purchasing or selling a ship + money change (positive = sell, negative = buy) | |||
Obtaining a ship from the rings | |||
|- | |||
|Services | |||
|Green | |||
|Purchasing services, will show money spent as a negative number | |||
|- | |||
|Repairs | |||
|Red | |||
|Shows the repairs made to ships. Any repairs made with insurance will show the deducted money in the description, but bank balance will be the same | |||
|- | |||
|Interlunar Transit | |||
|Blue | |||
|Shows any transit to and from the rings, one for each way, and displays the time spent doing so. | |||
|- | |||
|Crew Management | |||
|White | |||
|Shows wages paid to crew members, and displays the name of any crew dismissed from duty | |||
|- | |||
|Trading | |||
|White | |||
|Shows any change in money made by buying and selling ores and anomalies. A total balance change number (shown in green) and anomalies sold (if applicable, shown in red) will be shown by default, and any ores sold/bought will have the mass shown on inspecting the description. | |||
|- | |||
|Ring Dive | |||
|White | |||
|Shows the time spent on a dive and the total money change by default. Opening description gives a greater insight to what happened on the dive, such as: | |||
* Ore claimed (in kg) | |||
* Anomalies claimed | |||
* Expenses from purchases at dive screen or in-ring purchases | |||
* Profit gained from sales and other means | |||
* Propellant used (in kg) | |||
* Mass driver ammo used (in kg) | |||
* (Nano)drones used (in kg) | |||
* Lasers fired (in seconds) | |||
* Synchotrons discharged (in GJ) | |||
|} | |||
== Launch Ring Dive == | == Launch Ring Dive == | ||
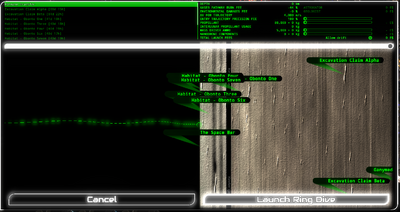
[[File:Dive Screen.png|thumb|400x400px|The Launch Ring Dive screen showing off several astrogation points, as well as showing discounts offered by crew (Click to enlarge)]] | |||
The launch ring dive screen is a vital menu for operations within Saturn's Rings. From it, you can select a location in the rings to astrogate to, pay a fee to have extra precision when entering the rings, choose how much remass, mass driver ammunition, & nanodrones are purchased before starting the dive, and choose to allow drift. | |||
The main feature of this menu is the map of the rings that is shown. It lets you astrogate to any point in the rings, up to a depth of 2,700 Km, however astrogating anywhere further than a depth of 0 Km will incur XASER pathway burn and environmental damage fees, which both can be lowered by up to 98% with an experienced enough astrogator and geologist respectively. Astrogating by default can be very inaccurate, however the precision can be increased by increasing the XASER and environmental fees by a multiplier of up to 2000%. | |||
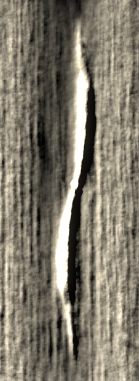
[[File:Propeller.png|thumb|A propeller formation, this specific one being the closest one to the edge of the rings]] | |||
Using this menu can be very helpful to travel to propellers, or the stripes of denser rock formations that are caused by the moonlets in the centre. These will generally contain significantly more ore than elsewhere in the rings, and particularly dense areas of them have [[Music|special music]] to signify it, usually close to the centre. | |||
Revision as of 20:26, 13 July 2024
The menu shown on Enceladus Prime can seem like a lot to take in. This guide aims to aide in making sense of the menu, as well as providing tips as to how the information some provides and lets you change can aide with your experience.
Overview of Enceladus Prime's Menu
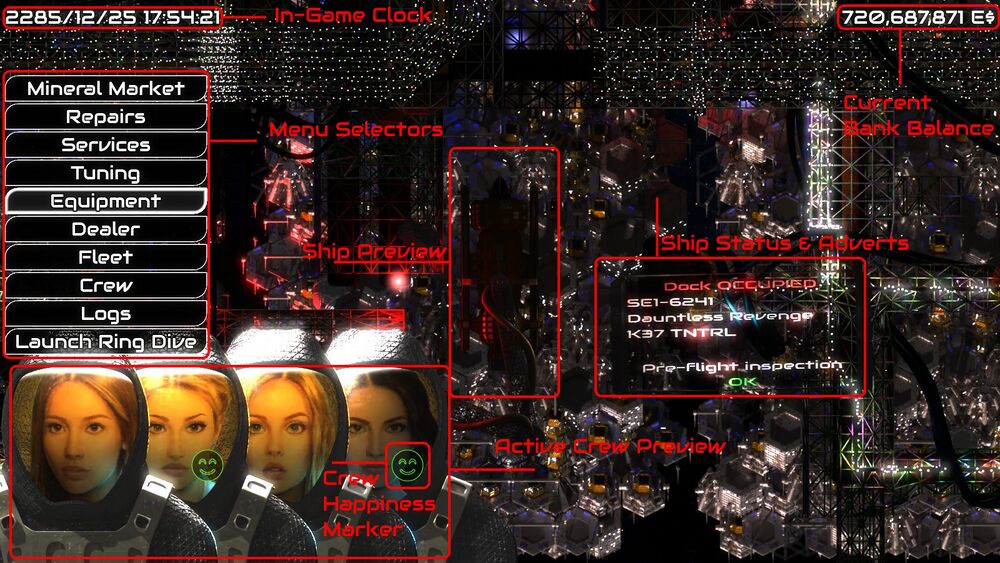 Enceladus Prime's menu can have a lot of information to take in.
Menu Selectors
These buttons link to the following menus:
- Mineral Market
- Repairs
- Services
- Equipment
- Dealer
- Fleet
- Crew
- Logs
- Launch Ring Dive
Current Bank Balance
Displays the current direct purchasing power. Several things are based around this number, regardless of worth elsewhere.
Ship Preview
Displays a visual of your currently selected ship
Ship Status & Adverts
- Displays your ship's identifier, name, hull type, and whether or not you are allowed to fly it in it's current state (see repairs)
- Displays adverts
- Displays recent changes in mineral prices (see mineral market)
In-Game Clock
This displays the current game date and time, useful for planning around crew paychecks.
Active Crew Preview & Crew Happiness Marker
Shows a mugshot for every crewmember currently active for the selected ship.
The happiness marker is displayed next to a crewmate that is particularly happy or unhappy
Menus
Mineral market
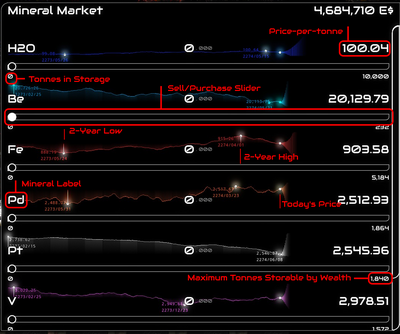
The mineral market is where the selling price of minerals is determined. The market also allows you to "play it" and use the predictions to potentially earn more than was spent, or be unlucky and lose some. It allows up to 10,000 tonnes to be stored in the market. Any ores you had from a dive will be sent to this area when the "Send to storage" button is pressed, however any ore that doesn't equal a tonne will be left in the market until more is added.
Predictions are referenced from previous activity on, so a gradual decline is more likely to spike later on. A geologist can help more accurately predict these future fluctuations.
In this example, Platinum has been on the decline for the last 2 years, and the 2 year low is pretty close to current, so a big increase is expected soon.
A 2-year high and low are both listed as points connected to dates. If you are close to the high, it is a good time to sell ores, and if you are close to the low, a good time to buy. Do note that fluctuations in the market aren't usually too big, so profit isn't made too easily with it.
Repairs
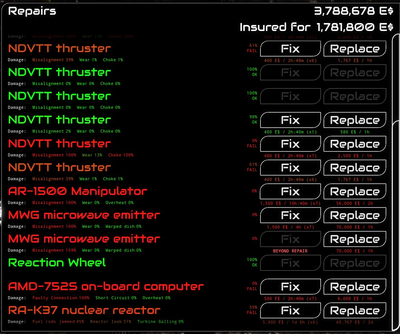
The repairs menu shows the status of all equipment on the ship, the damage level of any equipment that can be damaged, and allows you to repair that equipment to the best ability your mechanics can, or just straight up replace it.
Equipment damage on this menu is calculated as an average of all 3 types of damage that can happen to a piece of equipment. Once this average falls below 70%, it needs to be repaired before a ship is allowed to fly with it. The exception to this is a case when any equipment is damaged beyond 100%, where it becomes too damaged to be repaired, and requires it to be replaced.
The efficiency at which repairs can happen does have an exponential dropoff. Every subsequent repair will fix a decent chunk less than the previous attempt, up until you're repairing for only a 1% average change. It's generally most optimal to have the durability fall between the 80-90% region, as beyond that it becomes very costly for not much return.
Services
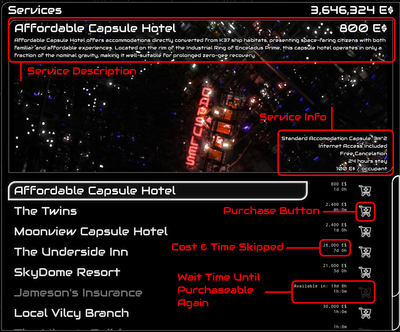
The services provided on Enceladus allow you to spend a night at a simple hotel, treat the crew to several activities to increase their happiness, purchase your monthly allotted insurance, and pay off any residual fines that you may have incurred.
The hotels and other activities lets you skip in-game time, and everything except the capsule hotel also provides a variable amount of happiness to your crew.
Some options will only be purchasable periodically, meaning that they cannot be chain purchases, and time has to be spent between purchasing again.
On the other side of things, any fines that have been incurred from Vilcy, Obonto Habitats, and/or other miners will be displayed at the bottom. These will vary depending on whether any damage was accidental, or increasing to a decent amount if substantial damage was sustained. Do note that fees cannot be paid off if an organization's headquarters isn't operational.
Tuning
The tuning menu allows for a whole array of modifications to the hardware you can install on your ship. This can range from increasing the power of a mass driver, changing the power of your thrusters, to tweaking how the autopilot behaves. The options this provides greatly increases the customisation potential for your ship even further than the options given from the equipment menu.
Due to the sheer number of options and possibilities, and the general complexity that this menu provides, it's options and capabilities will be furthered on this page here. This is a much more advanced menu, so it is recommended to delve into it only once you understand a decent bit of how different equipment works, and how different variables affect things.
The tuning menu also provides the Virtual Flight Service to test tuned setups pre-flight.
Equipment
The equipment menu will display and allow equipment installed to the ship to be inspected, and if you choose to, be replaced with a different item in it's place. Every different equipment piece has a use, some more specialised than others, and some may have uses that are not immediately obvious or have more than the initial obvious use.
Not every ship will be able to fit every piece of equipment. Many ships are specialised for different purposes, while others are better for a general role. The standard K37 is a ship capable of any task within the rings, and can be fitted with all equipment pieces, so it is a good choice to use when trying out different options.
Again, this page cannot fit the entirety of the necessary information about the equipment menu, so more in depth information will be on this page here.
Dealer
The dealer menu allows you to purchase new and used ships, and also will be where any ship you sell will show up (do note that any ship currently under repair cannot be sold until the repair is complete). It cycles on a per-day basis, with a used ship appearing in the dealership every day, and a new ship appearing once per week. A new TNTRL K37, Eagle Prospector, Elon Interstellar Model E, and AT-K225 Titan will always appear at the top of the dealership every week, and cycles weekly.
Ships in the dealership have an 11% markup, so the hull resell value will always be a little less than what you purchased it for, even with used ships. Ships will leave the dealership after a while as other ringas purchase ships. When purchasing a ship, you are also given the option to trade in your currently selected ship in the event you are confident in the purchase, and the ship is not currently going through repairs.
The ships that can currently appear in the dealer:
Every ship has it's own gimmick and use, no ship is 'better' than another ship, as one ship may do a specific task better than another, but may not be as good at a different task.
Fleet
The fleet menu shows the ships that you currently own, whether a ship is ok to fly, needs repair, or is currently undergoing repairs. There is no limit to the number of and types of ships that you are able to store.
Like the dealer, the fleet menu lets you see the information regarding a ship, as well as showing it's promotional footage, and letting you examine it. Examining a ship shows you the stats (number of and types of hardpoints, crew capacity, dry mass, cargo bay volume, and processed cargo mass limit), as well as providing the Minding Virtual Flight Service.
Crew
The crew menu allows you to hire crew, view the stats of your crew, change which crew members are active on a ship, and dismiss them from service. Having crew members can be a vital part of working in the rings, as each has a role that can greatly increase your performance when collecting ores, and keep track of things in the rings. Due to how complex it can get, more information is accessible on this page here.
The four types of crew & their jobs:
- Astrogator: Keeping track of objects in the rings for you to visit later on
- Geologist: identifies the content and value of ores, as well as better estimating the total value of ores on the market
- Mechanic: speeds up repair times so that you don't have to wait as long between repairs
- Pilot: increases the adrenal slowdown, as well as automatically starting it when close to collision
Crew can have a very wide variety of wages, from less than a few thousand for inexperienced crew, to dozens of thousands for a hardened and experienced crew. The lowest possible wages are listed per-role here:
- pilot: 400
- mechanic: 400
- geologist: 600
- astrogator: 500
Logs
The logs menu shows everything that you have done in the game over the past few months. It displays each event with a timestamp, how long it took (if applicable), the name/type of event, a change in cash in the bank (if applicable), and the current bank balance at the time of it's completion. Each event will be colour-coded with a different colour depending on the event type: White is management of resources, green is management of services, red is repairs, and blue is interlunar transit. Clicking the circle next to any event gives a more detailed description.
A full list of event types is as follows:
| Name | Colour | Description |
|---|---|---|
| Equipment | Green | Any changes to equipment, covers change in cost (money spent = negative, money received = positive) |
| Ships | Green | Purchasing or selling a ship + money change (positive = sell, negative = buy)
Obtaining a ship from the rings |
| Services | Green | Purchasing services, will show money spent as a negative number |
| Repairs | Red | Shows the repairs made to ships. Any repairs made with insurance will show the deducted money in the description, but bank balance will be the same |
| Interlunar Transit | Blue | Shows any transit to and from the rings, one for each way, and displays the time spent doing so. |
| Crew Management | White | Shows wages paid to crew members, and displays the name of any crew dismissed from duty |
| Trading | White | Shows any change in money made by buying and selling ores and anomalies. A total balance change number (shown in green) and anomalies sold (if applicable, shown in red) will be shown by default, and any ores sold/bought will have the mass shown on inspecting the description. |
| Ring Dive | White | Shows the time spent on a dive and the total money change by default. Opening description gives a greater insight to what happened on the dive, such as:
|
Launch Ring Dive
The launch ring dive screen is a vital menu for operations within Saturn's Rings. From it, you can select a location in the rings to astrogate to, pay a fee to have extra precision when entering the rings, choose how much remass, mass driver ammunition, & nanodrones are purchased before starting the dive, and choose to allow drift.
The main feature of this menu is the map of the rings that is shown. It lets you astrogate to any point in the rings, up to a depth of 2,700 Km, however astrogating anywhere further than a depth of 0 Km will incur XASER pathway burn and environmental damage fees, which both can be lowered by up to 98% with an experienced enough astrogator and geologist respectively. Astrogating by default can be very inaccurate, however the precision can be increased by increasing the XASER and environmental fees by a multiplier of up to 2000%.
Using this menu can be very helpful to travel to propellers, or the stripes of denser rock formations that are caused by the moonlets in the centre. These will generally contain significantly more ore than elsewhere in the rings, and particularly dense areas of them have special music to signify it, usually close to the centre.
