Hyperflare (talk | contribs) |
(added note on astrogation target icon color changing and fixed typos) |
||
| (4 intermediate revisions by the same user not shown) | |||
| Line 1: | Line 1: | ||
The OMS menu allows you to configure your ship while on a dive. The menu is accessed via the J key. | The OMS menu allows you to configure your ship while on a dive. The menu is accessed via the J key. Any [[crew]] that you have with you on your ship will have their portrait shown in the background of the menu appropriate of their job. | ||
A comms box is shown at the bottom of any tabs, which lets you interact with any current conversations, or view older conversations that happened that dive. | |||
The amount that you're currently insured by and are stored in the bank are shown at the top of the comms box, on the left and right respectively. | |||
=Pilot= | =Pilot= | ||
[[File:OMS - Pilot tab.jpg|1080x1080px]] | |||
The pilot menu provides you with a significantly larger view of [[LIDAR]], and allows you to identify, hail, and potentially communicate with other ships. | |||
IFF is handled with this menu, where it will mark any identified ship with an appropriate "friendliness" meter. Most ships you see will fall under a neutral yellow, which indicates it's a ship that has a registered [[Ship Registration Codes|transponder]] and does not outwardly appear hostile. Any ships automatically marked under a green, or friendly filter, are any drones of yours ([[B8 Claim Beacon|claim beacons]], [[THICC|THICCs]], [[NT Mining Companion|NT companions]], etc.), or any ship that you have hired. These ships will almost never attack you, as your drones can't, and your hired ships will only do so when you aggravate them. On the flip side, a red marker indicates any ship flying without a transponder ([[UIO]]), or a ship that has engaged in combat against you or an ally. These markers, if not automatically set, can be changed by small amounts when combat occurs, where generally any ship firing on a UIO gains friendliness, and the UIO completely turns red. | |||
=Geologist= | =Geologist= | ||
[[File:OMS - Geologist.jpg|1080x1080px]] | |||
The | The geologist menu provides an in-depth overview of the ore content of both your [[Cargo Bay|cargo bay]] and [[Processed Cargo|processed storage]] holds, but also within the surrounding area as well. The menu also allows you to choose certain settings for equipment pieces that handle ore. | ||
The ore compositions of your cargo bay are provided in a much higher resolution in this menu than that of what is shown on the [[Head-Up Display|HUD]], being good to more accurately figure out how much more you can fill the cargo bay from what's there. As for processed ore storage, the total is displayed next to the cargo bay display. It will show the total of each ore, as well as any contained in a [[Cargo Container|cargo container]]. Any equipment listed that contains ore will have the mass of the specific ore contained within it on top of the power button underneath the specific ore label. | |||
The options given for any equipment that handles ore will be displayed sequentially. Any equipment that handles it will use the toggle grid displayed, with each power button signifying an ore that the equipment is allowed to hold, alongside the other restrictions. Equipment involved in external handling of ore will be restrained by the ore type selected. If an ore is selected, any chunk containing it will be grabbed if passing the other filters (NOTE, water is a mineral found in all ore chunks, selecting this will grab any ore chunk that passes other checks). The other options given to handling equipment are Unmarked tags, which will allow the grabbing of ore before it is fully identified (ID'd) by the geologist, and may grab other objects depending on the equipment ([[Nanodrones|Tug and haul drones]] will also attempt to grab [[Lifepod|lifepods]] with this option, the [[AR-1500 Manipulator|AR-1500 Manipulator arm]] will attempt to grab rocks, lifepods, [[Uranium Crystal|serenity torbernite crystals]], and derelict ships), but the NT companion will only attempt to capture ores. Handling equipment also has a price slider, which will stop IDing ores that do not have a total value greater or equal to the value set. | |||
Containers work on a different system, where only ore toggles are displayed. These toggles allow you to change what is allowed inside the container. This feature is especially useful for the mono THICC, where you would only want to allow one or two specifics inside it. If there is ore within a container that has that specific ore disabled, it will drain to the internal processed cargo hold, where it will be distributed between other containers if any exist, or just stay in the internal hold. It's useful when wanting to release a THICC to capture another object with the cradle. | |||
Current equipment pieces that work with the geologist menu: | |||
* [[AR-1500 Manipulator]]: Collects ore, rocks, lifepods, serenity torbernite, derelicts. | |||
* [[Tug Drones|Tug drones]]: Stops ore, lifepods, relative to rings | |||
* [[Haul Drones|Haul drones]]: Collects ore, lifepods | |||
* [[NT Mining Companion]]: Collects ore | |||
* [[Cargo Container|THI Cargo Container]]: Stores ore, 15 tonnes per mineral | |||
* [[Cargo Container#THI Monocargo Container|THI Mono Cargo Container]]: Stores ore, 90 tonnes of a singular mineral | |||
=Astrogator= | |||
[[File:OMS - Astrogator.jpg|1080x1080px]] | |||
The astrogator menu provides a birds-eye view of the rings centered on your position, as well as displaying the astrogation points list. | |||
The astrogation points are split into three different types: Large objects, anomaly points, and intractable events. Large objects will for the most part include [[Moonlet|moonlets]] and [[:Category:Stations|stations]], anomaly points include radar anomalies (usually ships), big LIDAR contacts (usually moonlet-like objects), and [[pirate]] drop points, and interactable events include your [[B8 Claim Beacon|claim beacons]], racing events, Vilcy rendevouz, and Vilcy drop points. It is generally recommended to hire an astrogator for this job to extend the tracking time, as all points (exc. claims) will only last for 12 hours without their input, meaning they can only be seen that dive. If a large object's contact is lost, the point moves to the lost destinations list (shown by the toggle of the same name). A lost point will still be there, but the object will drift further from where you astrogate to it the longer it is left unfound. | |||
[[File:Astrogation blocked.png|thumb|Attempted astrogation, but it is blocked because there are rocks in the way]] | |||
Astrogating to a point involves selecting the point, and pressing the "plot a course" button. The default settings will automatically guide you to the target. Astrogation will be blocked when the LIDAR sweeps over an object in the way of the course, which will stop the calculation until no object is detected. This can be mitigated by adjusting your course to avoid them, or choosing a slower speed to not run into rocks as fast. It may also be a good idea to disable the "use autopilot" option, as this will automatically set a velocity and orientation for the ship, which may be undesirable in a given situation, especially if it would throw you right into a rock or fling something held by a manipulator arm into deep space. Tuning speed will change how quickly you travel to a destination, ranging from 10 m/s to 100 m/s when the max autopilot velocity is tuned that high (the [[Bald Eagle]] can astrogate as fast as 190 m/s due to it's custom hull) Going faster may be useful if you want to complete a dive quick to do more before the paychecks are due, but is significantly more likely to cause collisions. | |||
Astrogation targets (excluding [[Enceladus Prime]]) can have their icon colour changed to one of 8 colors for better organization | |||
=Mechanic= | =Mechanic= | ||
[[File:OMS - mechanic.jpg|1080x1080px]] | |||
It | |||
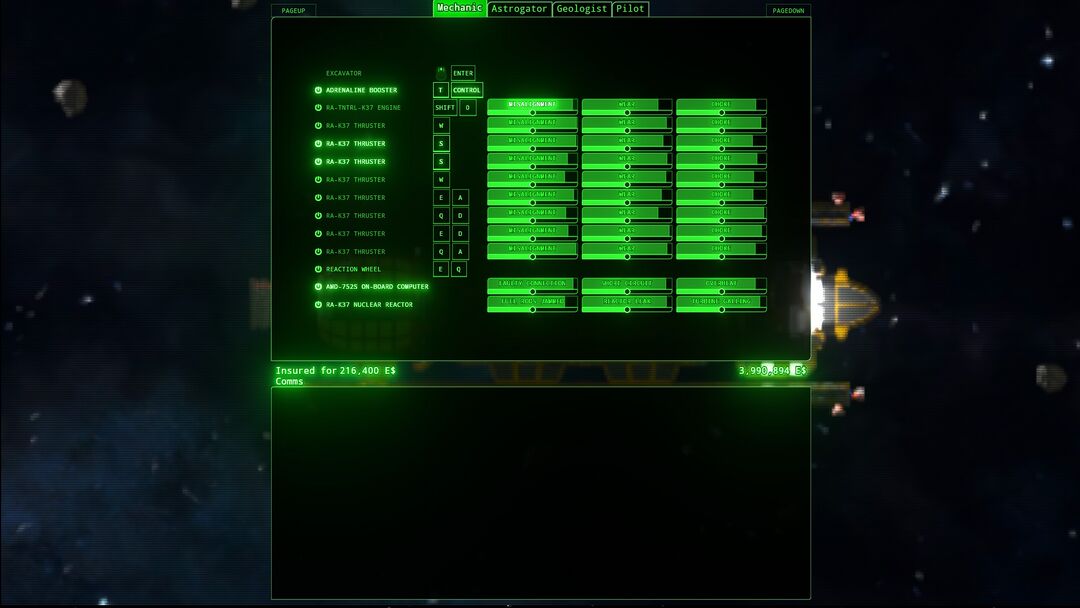
The mechanic tab allows you to view the damage status of equipment that is vunerable, jury-rig it to get more use out of it, and disable/enable equipment. | |||
The main feature of the mechanic tab is the ability to jury-rig equipment to put it back into working order. Moving a slider to the right increases the available durability available to that equipment, good in case it is damaged, at the cost of making it more vunerable to that damage type. The reverse is true, where the further left the slider is, the more damage to that type does, at the cost of reducing the amount of that damage type is taken. The damage will be split equally between all three sliders, so if one damage type is lowered to the minimum, the other two will take more damage to compensate. | |||
The second ability that the mechanic tab has is the ability to disable and enable any equipment piece on your ship (even the reactor). Disabling it reduces damage taken, especially useful for EMP [[damage]] done to equipment vulnerable to it. It works the exact same as hitting a numerical hotkey to disable tools whilst flying, but expands to the rest of the ship's systems. | |||
== Notes == | |||
* Having objects inside the astrogation zone can be janked by using a very slow LIDAR speed | |||
* Jury-rigging a damage type to it's lowest makes an equipment piece practically invincible to that damage specifically | |||
* Restarting a computer may be helpful when there's is too much on screen, or you lost track of the [[Reconnaissance Craft#Obonto USV-GOT|GOT's targeting system]] | |||
Latest revision as of 05:21, 24 October 2024
The OMS menu allows you to configure your ship while on a dive. The menu is accessed via the J key. Any crew that you have with you on your ship will have their portrait shown in the background of the menu appropriate of their job.
A comms box is shown at the bottom of any tabs, which lets you interact with any current conversations, or view older conversations that happened that dive.
The amount that you're currently insured by and are stored in the bank are shown at the top of the comms box, on the left and right respectively.
Pilot
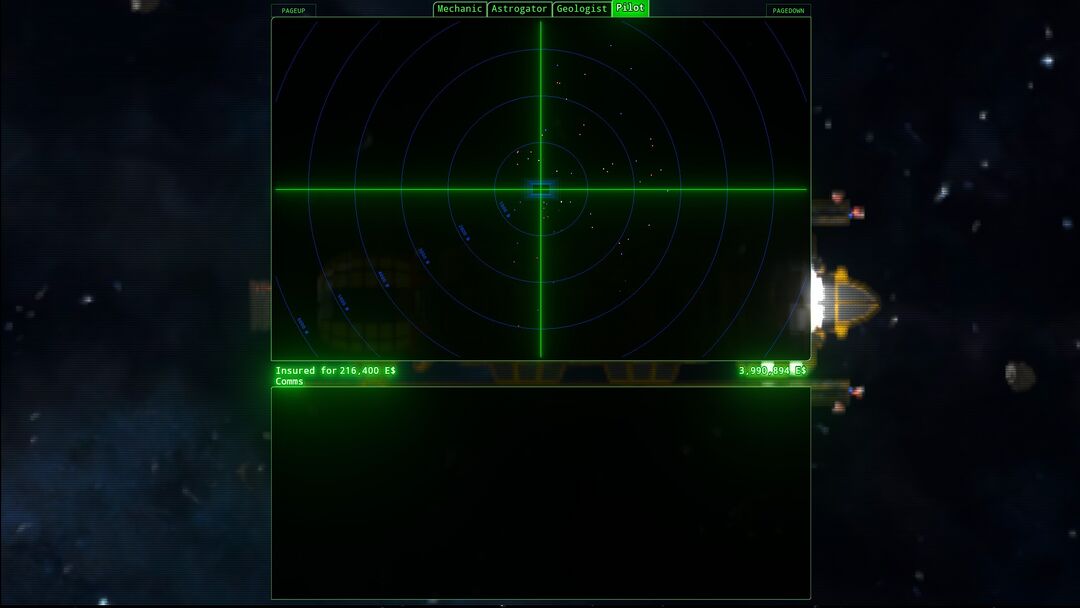
The pilot menu provides you with a significantly larger view of LIDAR, and allows you to identify, hail, and potentially communicate with other ships.
IFF is handled with this menu, where it will mark any identified ship with an appropriate "friendliness" meter. Most ships you see will fall under a neutral yellow, which indicates it's a ship that has a registered transponder and does not outwardly appear hostile. Any ships automatically marked under a green, or friendly filter, are any drones of yours (claim beacons, THICCs, NT companions, etc.), or any ship that you have hired. These ships will almost never attack you, as your drones can't, and your hired ships will only do so when you aggravate them. On the flip side, a red marker indicates any ship flying without a transponder (UIO), or a ship that has engaged in combat against you or an ally. These markers, if not automatically set, can be changed by small amounts when combat occurs, where generally any ship firing on a UIO gains friendliness, and the UIO completely turns red.
Geologist
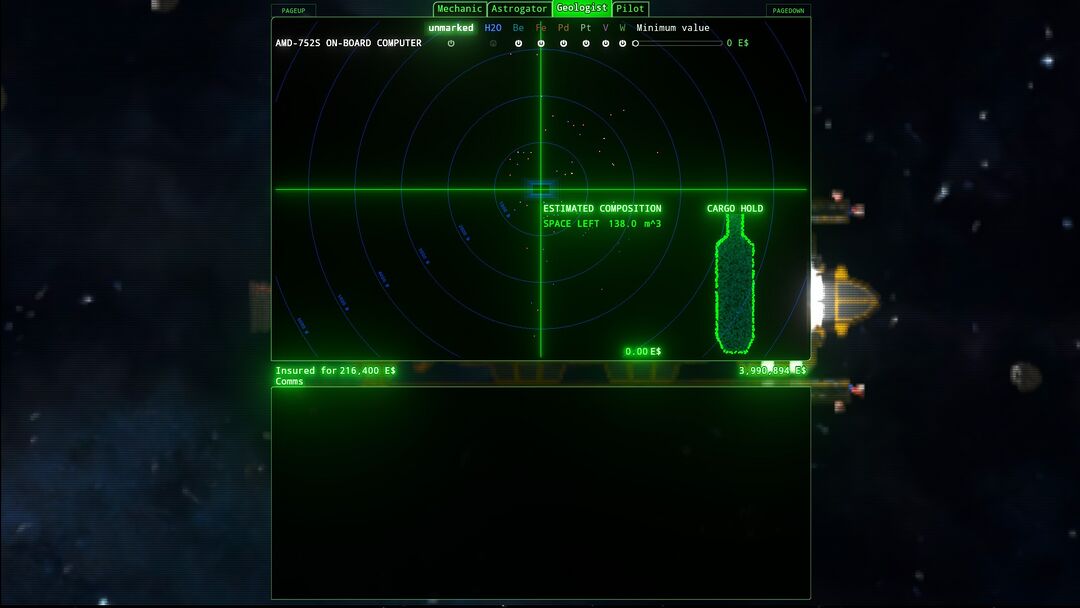
The geologist menu provides an in-depth overview of the ore content of both your cargo bay and processed storage holds, but also within the surrounding area as well. The menu also allows you to choose certain settings for equipment pieces that handle ore.
The ore compositions of your cargo bay are provided in a much higher resolution in this menu than that of what is shown on the HUD, being good to more accurately figure out how much more you can fill the cargo bay from what's there. As for processed ore storage, the total is displayed next to the cargo bay display. It will show the total of each ore, as well as any contained in a cargo container. Any equipment listed that contains ore will have the mass of the specific ore contained within it on top of the power button underneath the specific ore label.
The options given for any equipment that handles ore will be displayed sequentially. Any equipment that handles it will use the toggle grid displayed, with each power button signifying an ore that the equipment is allowed to hold, alongside the other restrictions. Equipment involved in external handling of ore will be restrained by the ore type selected. If an ore is selected, any chunk containing it will be grabbed if passing the other filters (NOTE, water is a mineral found in all ore chunks, selecting this will grab any ore chunk that passes other checks). The other options given to handling equipment are Unmarked tags, which will allow the grabbing of ore before it is fully identified (ID'd) by the geologist, and may grab other objects depending on the equipment (Tug and haul drones will also attempt to grab lifepods with this option, the AR-1500 Manipulator arm will attempt to grab rocks, lifepods, serenity torbernite crystals, and derelict ships), but the NT companion will only attempt to capture ores. Handling equipment also has a price slider, which will stop IDing ores that do not have a total value greater or equal to the value set.
Containers work on a different system, where only ore toggles are displayed. These toggles allow you to change what is allowed inside the container. This feature is especially useful for the mono THICC, where you would only want to allow one or two specifics inside it. If there is ore within a container that has that specific ore disabled, it will drain to the internal processed cargo hold, where it will be distributed between other containers if any exist, or just stay in the internal hold. It's useful when wanting to release a THICC to capture another object with the cradle.
Current equipment pieces that work with the geologist menu:
- AR-1500 Manipulator: Collects ore, rocks, lifepods, serenity torbernite, derelicts.
- Tug drones: Stops ore, lifepods, relative to rings
- Haul drones: Collects ore, lifepods
- NT Mining Companion: Collects ore
- THI Cargo Container: Stores ore, 15 tonnes per mineral
- THI Mono Cargo Container: Stores ore, 90 tonnes of a singular mineral
Astrogator
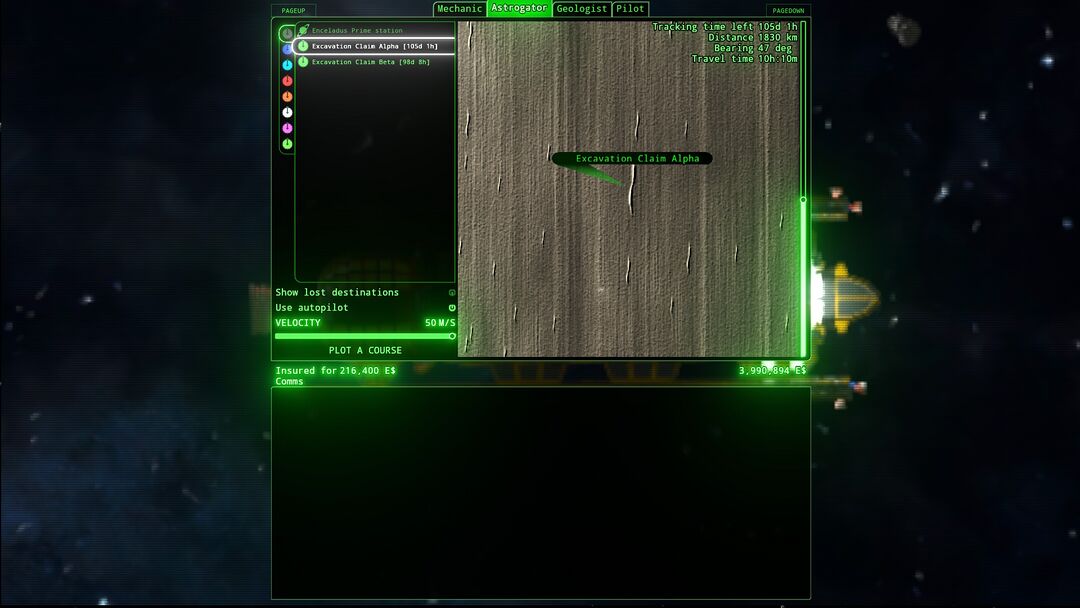
The astrogator menu provides a birds-eye view of the rings centered on your position, as well as displaying the astrogation points list.
The astrogation points are split into three different types: Large objects, anomaly points, and intractable events. Large objects will for the most part include moonlets and stations, anomaly points include radar anomalies (usually ships), big LIDAR contacts (usually moonlet-like objects), and pirate drop points, and interactable events include your claim beacons, racing events, Vilcy rendevouz, and Vilcy drop points. It is generally recommended to hire an astrogator for this job to extend the tracking time, as all points (exc. claims) will only last for 12 hours without their input, meaning they can only be seen that dive. If a large object's contact is lost, the point moves to the lost destinations list (shown by the toggle of the same name). A lost point will still be there, but the object will drift further from where you astrogate to it the longer it is left unfound.
Astrogating to a point involves selecting the point, and pressing the "plot a course" button. The default settings will automatically guide you to the target. Astrogation will be blocked when the LIDAR sweeps over an object in the way of the course, which will stop the calculation until no object is detected. This can be mitigated by adjusting your course to avoid them, or choosing a slower speed to not run into rocks as fast. It may also be a good idea to disable the "use autopilot" option, as this will automatically set a velocity and orientation for the ship, which may be undesirable in a given situation, especially if it would throw you right into a rock or fling something held by a manipulator arm into deep space. Tuning speed will change how quickly you travel to a destination, ranging from 10 m/s to 100 m/s when the max autopilot velocity is tuned that high (the Bald Eagle can astrogate as fast as 190 m/s due to it's custom hull) Going faster may be useful if you want to complete a dive quick to do more before the paychecks are due, but is significantly more likely to cause collisions.
Astrogation targets (excluding Enceladus Prime) can have their icon colour changed to one of 8 colors for better organization
Mechanic
The mechanic tab allows you to view the damage status of equipment that is vunerable, jury-rig it to get more use out of it, and disable/enable equipment.
The main feature of the mechanic tab is the ability to jury-rig equipment to put it back into working order. Moving a slider to the right increases the available durability available to that equipment, good in case it is damaged, at the cost of making it more vunerable to that damage type. The reverse is true, where the further left the slider is, the more damage to that type does, at the cost of reducing the amount of that damage type is taken. The damage will be split equally between all three sliders, so if one damage type is lowered to the minimum, the other two will take more damage to compensate.
The second ability that the mechanic tab has is the ability to disable and enable any equipment piece on your ship (even the reactor). Disabling it reduces damage taken, especially useful for EMP damage done to equipment vulnerable to it. It works the exact same as hitting a numerical hotkey to disable tools whilst flying, but expands to the rest of the ship's systems.
Notes
- Having objects inside the astrogation zone can be janked by using a very slow LIDAR speed
- Jury-rigging a damage type to it's lowest makes an equipment piece practically invincible to that damage specifically
- Restarting a computer may be helpful when there's is too much on screen, or you lost track of the GOT's targeting system
