(add screenshots and improve formatting of them) |
m (→Bug Reporting: fix markup (i keep using Markdown by accident)) |
||
| (2 intermediate revisions by the same user not shown) | |||
| Line 3: | Line 3: | ||
=dV-Annotate Windows Utility= | =dV-Annotate Windows Utility= | ||
This is a human-readable script for Windows PowerShell 5.1 (the powershell.exe that ships with Windows 10 and later). | This is a human-readable script for Windows PowerShell 5.1 (the powershell.exe that ships with Windows 10 and later). You can [https://github.com/NimrodXMods/dv-annotate/tree/main/windows/build download it from the GitHub repo here.] | ||
It is a GUI utility to help people using Windows archive game logs, saved games, screenshots, and also timestamps of events for bug reports. I wrote it in PowerShell but no knowledge of PowerShell or command lines is needed to run it. | It is a GUI utility to help people using Windows archive game logs, saved games, screenshots, and also timestamps of events for bug reports. I wrote it in PowerShell but no knowledge of PowerShell or command lines is needed to run it. | ||
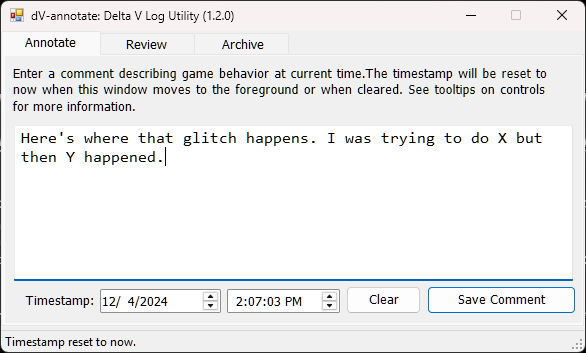
[[File:Dv-annotate-screenshot1.png|alt=Screenshot of dv-annotate's Annotate tab|frame|Annotate Tab]] | [[File:Dv-annotate-screenshot1.png|alt=Screenshot of dv-annotate's Annotate tab|frame|Annotate Tab]] | ||
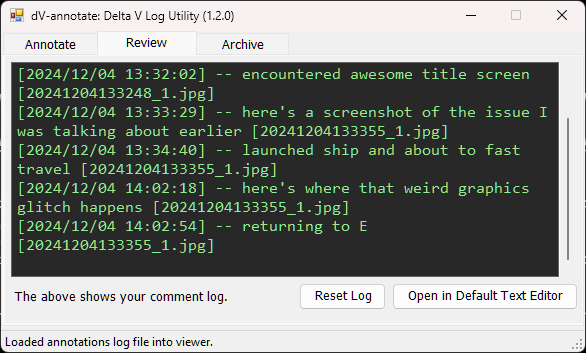
[[File:Dv-annotate-screenshot2.png|alt=Screenshot of dv-annotate's Review tab|frame|Review Tab]] | [[File:Dv-annotate-screenshot2.png|alt=Screenshot of dv-annotate's Review tab|frame|Review Tab]] | ||
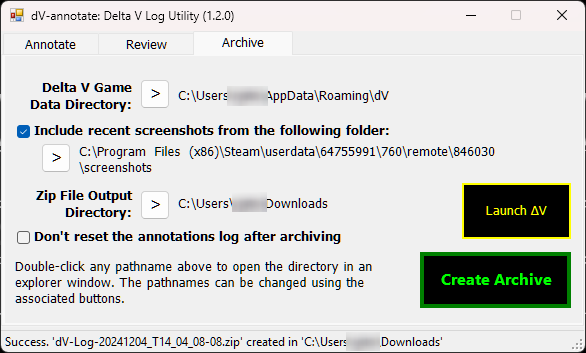
[[File:Dv-annotate-screenshot3.png|alt=Screenshot of dv-annotate's Archive tab|frame|Archive | [[File:Dv-annotate-screenshot3.png|alt=Screenshot of dv-annotate's Archive tab|frame|Archive Tab]] | ||
The reason for a script like this is that it can be rather difficult to keep track of when different things happen during gameplay that might be relevant for debugging, and the more timestamps and descriptive info the developer can get, the less time they have to spend looking for stuff. So this can save a lot of developer time and also make it more possible to discover more issues, etc. | The reason for a script like this is that it can be rather difficult to keep track of when different things happen during gameplay that might be relevant for debugging, and the more timestamps and descriptive info the developer can get, the less time they have to spend looking for stuff. So this can save a lot of developer time and also make it more possible to discover more issues, etc. | ||
| Line 20: | Line 20: | ||
'''To actually run it, just right-click on dv-annotate.ps1 in Windows Explorer and select "Run with PowerShell".''' | '''To actually run it, just right-click on dv-annotate.ps1 in Windows Explorer and select "Run with PowerShell".''' | ||
The first time it is run it will | The first time it is run it will do a "lightweight install" which means it will offer to move itself to <code>%AppData%\dV-annotate\</code> and create a shortcut in its current location that will allow it to be run in a normal manner without opening a terminal window. This shortcut can be moved anywhere you want and it will still work. | ||
After running for the first time it will create a settings file in <code>%AppData%\dV-annotate\</code>. | |||
It can be completely removed by just deleting <code>%AppData%\dV-annotate\</code> and the shortcut. | |||
==Configuration== | ==Configuration== | ||
If you need to change any paths or settings, see the '''Archive''' tab. | If you need to change any paths or settings, see the '''Archive''' tab. Settings are stored in: <code>%AppData%\dV-annotate\prefs.json</code> | ||
I tried to do as much autoconfiguration as possible with reasonable defaults. | |||
If you want to modify the script yourself, all the important functions are at the top of the file and all the ugly tool-generated GUI stuff is toward the bottom. It's just a normal plain text file PowerShell script, so it can be read and edited with any text editor. | |||
==Usage== | ==Usage== | ||
The easiest way to use this is to run | The easiest way to use this is to run it before launching the game. (There's a "Launch dV" button in the Archive tab to make this easier.) | ||
As long as you have the Annotate tab selected, the input focus will switch to the textbox and so you can just <code>Alt+Tab</code>, Type a comment, hit enter, and <code>Alt+Tab</code> again to go back to playing. | During the game, just bring the window to the front by using <code>Alt+Tab</code>, type in a comment, hit Enter, then <code>Alt+Tab</code> again to make it go away and go back to playing. By default, the game will automatically pause when it gets sent to the background (unless you changed this in settings). | ||
As long as you have the Annotate tab selected, the input focus will switch to the textbox, the timestamp will be updated to "now", and so you can just <code>Alt+Tab</code>, Type a comment, hit enter, and <code>Alt+Tab</code> again to go back to playing. So switch, type, switch, and the game should pause while typing. | |||
===Including Screenshots (optional)=== | ===Including Screenshots (optional)=== | ||
If using Steam then you can use <code>F12</code> to take screenshots of anything interesting. (This requires having the Steam Overlay enabled.) The script by default try to find the Steam screenshots folder for Delta V, and will include screenshots that were taken since the annotation log was reset. Therefore you don't need to delete screenshots to keep them out of the archive. | If using Steam then you can use <code>F12</code> to take screenshots of anything interesting. (This requires having the Steam Overlay enabled for the game.) | ||
The script by default will try to find the Steam screenshots folder for Delta V, and will include screenshots that were taken since the annotation log was reset. Therefore you don't need to delete older screenshots to keep them out of the archive. | |||
You can also set your own screenshots folder | You can also set your own screenshots folder manually. This folder will get used to include any jpg or png files newer than the last annotation log reset. Since it can't tell if a image is a screenshot of the game, it's a good idea to use a folder that only contains screenshots of dV. Any screenshot utility can be used or you can just manually place screenshot images in the directory you set. | ||
===When to Archive=== | ===When to Archive=== | ||
The recommended time to create the .zip archive is '''after returning to Enceladus''' (which saves the game) but '''before exiting the game'''. This helps to ensure that the Godot engine log doesn't get blown away and that anything interesting is saved in the game save. | The recommended time to create the .zip archive is '''after returning to Enceladus''' (which saves the game) but '''before exiting the game'''. This helps to ensure that the Godot engine log doesn't get blown away and that anything interesting that happened is saved in the game save data. Creating the archive at other times isn't terrible but isn't as useful as doing so at this time. | ||
The script '''can archive the game directory while the game is running''' without any problems. | The script '''can archive the game directory while the game is running''' without any problems, so quitting the game is not required. | ||
==Windows Download== | ==Windows Download== | ||
Download the script from GitHub here: [https://github.com/NimrodXMods/dv-annotate/tree/main/windows dv-annotate.ps1] | Download the script from GitHub here: [https://github.com/NimrodXMods/dv-annotate/tree/main/windows/build dv-annotate.ps1] | ||
=dv-annotate bash Scripts (Linux/SteamOS/OSX)= | =dv-annotate bash Scripts (Linux/SteamOS/OSX)= | ||
The | The scripts can be downloaded from GitHub here: [https://github.com/NimrodXMods/dv-annotate/tree/main/bash-steamos-linux-osx dv-annotate.sh] | ||
I threw these scripts together quickly just for myself, so they’re pretty minimal. But I fixed them up some in case anyone else wants to use them. They're roughly the equivalent of the windows utility above, but require familiarity with bash command line usage. | |||
I use these on SteamOS but they should work on any Linux and probably OSX if the pathnames are set properly. | I use these on SteamOS but they should work on any Linux and probably OSX if the pathnames are set properly. | ||
| Line 68: | Line 80: | ||
Run this to review current annotations or the ones in the most recent archive. | Run this to review current annotations or the ones in the most recent archive. | ||
= | =Questions?= | ||
For questions or other discussion, see the [https://discord.gg/dv Delta V Discord] <code>#workshop</code> channel thread. | |||
=Bug Reporting= | |||
For information on troubleshooting and bug reporting info, see the '''bottom section''' of the [[Troubleshooting]] page. | |||
Latest revision as of 03:39, 5 December 2024
This page describes two different "dv-annotate" tools: one GUI-based utility for Windows, and one package of simple bash scripts for Linux/SteamOS/OSX. These are for keeping notes on when problems happen (annotations) and creating a zip or tgz archive of the game data directory to aid in debugging.
dV-Annotate Windows Utility
This is a human-readable script for Windows PowerShell 5.1 (the powershell.exe that ships with Windows 10 and later). You can download it from the GitHub repo here.
It is a GUI utility to help people using Windows archive game logs, saved games, screenshots, and also timestamps of events for bug reports. I wrote it in PowerShell but no knowledge of PowerShell or command lines is needed to run it.
The reason for a script like this is that it can be rather difficult to keep track of when different things happen during gameplay that might be relevant for debugging, and the more timestamps and descriptive info the developer can get, the less time they have to spend looking for stuff. So this can save a lot of developer time and also make it more possible to discover more issues, etc.
Installation/Setup
This is just a plain text .ps1 (PowerShell) script, but it creates a GUI so you don't need to run it from the command line. Just download the .ps1 file and save it wherever it's convenient.
If you double click on the script it won't execute, but instead should get opened in a text editor. (I encourage everyone to review it because it's a good idea to look for anything suspicious in scripts before running them.)
To actually run it, just right-click on dv-annotate.ps1 in Windows Explorer and select "Run with PowerShell".
The first time it is run it will do a "lightweight install" which means it will offer to move itself to %AppData%\dV-annotate\ and create a shortcut in its current location that will allow it to be run in a normal manner without opening a terminal window. This shortcut can be moved anywhere you want and it will still work.
After running for the first time it will create a settings file in %AppData%\dV-annotate\.
It can be completely removed by just deleting %AppData%\dV-annotate\ and the shortcut.
Configuration
If you need to change any paths or settings, see the Archive tab. Settings are stored in: %AppData%\dV-annotate\prefs.json
I tried to do as much autoconfiguration as possible with reasonable defaults.
If you want to modify the script yourself, all the important functions are at the top of the file and all the ugly tool-generated GUI stuff is toward the bottom. It's just a normal plain text file PowerShell script, so it can be read and edited with any text editor.
Usage
The easiest way to use this is to run it before launching the game. (There's a "Launch dV" button in the Archive tab to make this easier.)
During the game, just bring the window to the front by using Alt+Tab, type in a comment, hit Enter, then Alt+Tab again to make it go away and go back to playing. By default, the game will automatically pause when it gets sent to the background (unless you changed this in settings).
As long as you have the Annotate tab selected, the input focus will switch to the textbox, the timestamp will be updated to "now", and so you can just Alt+Tab, Type a comment, hit enter, and Alt+Tab again to go back to playing. So switch, type, switch, and the game should pause while typing.
Including Screenshots (optional)
If using Steam then you can use F12 to take screenshots of anything interesting. (This requires having the Steam Overlay enabled for the game.)
The script by default will try to find the Steam screenshots folder for Delta V, and will include screenshots that were taken since the annotation log was reset. Therefore you don't need to delete older screenshots to keep them out of the archive.
You can also set your own screenshots folder manually. This folder will get used to include any jpg or png files newer than the last annotation log reset. Since it can't tell if a image is a screenshot of the game, it's a good idea to use a folder that only contains screenshots of dV. Any screenshot utility can be used or you can just manually place screenshot images in the directory you set.
When to Archive
The recommended time to create the .zip archive is after returning to Enceladus (which saves the game) but before exiting the game. This helps to ensure that the Godot engine log doesn't get blown away and that anything interesting that happened is saved in the game save data. Creating the archive at other times isn't terrible but isn't as useful as doing so at this time.
The script can archive the game directory while the game is running without any problems, so quitting the game is not required.
Windows Download
Download the script from GitHub here: dv-annotate.ps1
dv-annotate bash Scripts (Linux/SteamOS/OSX)
The scripts can be downloaded from GitHub here: dv-annotate.sh
I threw these scripts together quickly just for myself, so they’re pretty minimal. But I fixed them up some in case anyone else wants to use them. They're roughly the equivalent of the windows utility above, but require familiarity with bash command line usage.
I use these on SteamOS but they should work on any Linux and probably OSX if the pathnames are set properly.
dv-archive.include.sh
Edit this to set pathnames and such for screenshots. Not much needs changing here, but OSX will need more changes.
dv-annotate
Run this to save a comment plus the timestamp of when you started the script and the file name of the most recent screenshot in the screenshots dir.
dv-archive
Run this to archive the dV game directory along with the annotations and screenshots taken since the first annotation.
dv-show-annotations
Run this to review current annotations or the ones in the most recent archive.
Questions?
For questions or other discussion, see the Delta V Discord #workshop channel thread.
Bug Reporting
For information on troubleshooting and bug reporting info, see the bottom section of the Troubleshooting page.


